FINDER OPTA ARDUINO
Die OPTA Arduino-Reihe
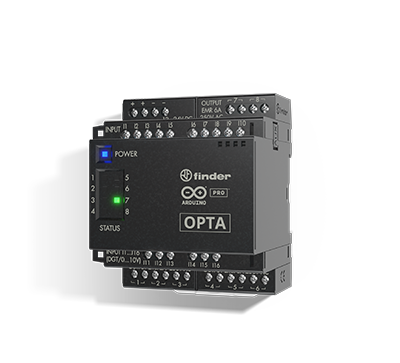
Das Finder OPTA Arduino PLR kombiniert die industrielle Erfahrung von Finder mit der technologischen Innovation von Arduino zu einem wirklich einzigartigen Produkt auf dem Markt. Es wurde mit Blick auf eine einfache Implementierung entwickelt und nutzt die breite Palette von Bibliotheken und Skizzen/Software, die in der Arduino Pro Plattform für jede Art von Anwendung verfügbar sind.
Dies reduziert die Programmierzeit erheblich und spart je nach Komplexität der Anwendung mehrere Tage. Diese Geräte können sowohl mit den traditionellen IEC61131-3-Sprachen (KOP, FBS, etc.) als auch mit der Open-Source-Sprache Arduino IDE kostenlos programmiert werden. Die OPTA Arduino-Reihe umfasst drei verschiedene Versionen: LITE, PLUS und ADVANCED.
- LITE
- PLUS
- ADVANCED
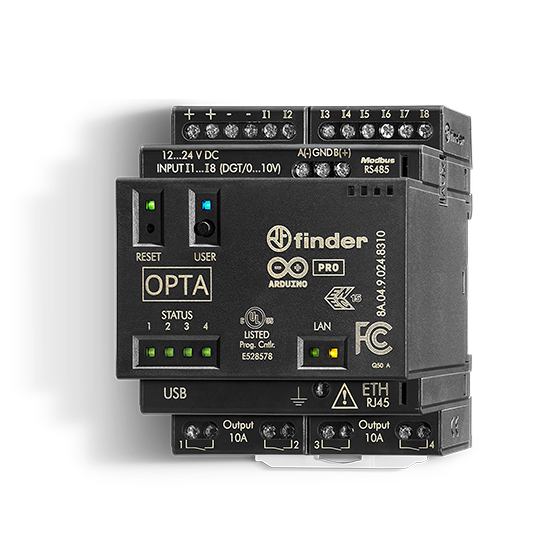
LITE
Typ 8A.04.9.024.8300
- Versorgungsspannung 12…24 V DC
- 8 digitale/analoge (0-10 V) Eingänge
- 4 Relaisausgänge, 10A
- Hochgeschwindigkeits-USB-Anschluss (Typ C) für:
- Programmierung
- Spannungsversorgung während der Konfiguration
- Datensicherung (über Speichermedium)
- RJ45 Ethernet oder Modbus TCP/IP Anschluss
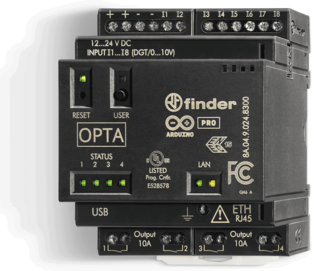
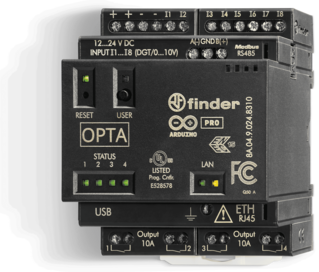
PLUS
Typ 8A.04.9.024.8310
- Versorgungsspannung 12…24 V DC
- 8 digitale/analoge (0-10 V) Eingänge
- 4 Relaisausgänge, 10A
- Hochgeschwindigkeits-USB-Anschluss (Typ C) für:
- Programmierung
- Spannungsversorgung während der Konfiguration
- Datensicherung (über Speichermedium)
- RJ45 Ethernet oder Modbus TCP/IP Anschluss
- RS485-Port für MODBUS RTU-Verbindung
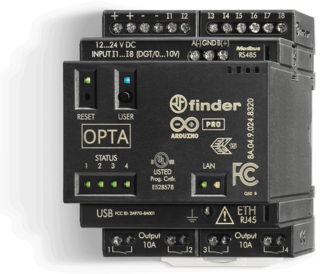
ADVANCED
Typ 8A.04.9.024.8320
- Versorgungsspannung 12…24 V DC
- 8 digitale/analoge (0-10 V) Eingänge
- 4 Relaisausgänge, 10A
- Hochgeschwindigkeits-USB-Anschluss (Typ C) für:
- Programmierung
- Spannungsversorgung während der Konfiguration
- Datensicherung (über Speichermedium)
- RJ45 Ethernet oder Modbus TCP/IP Anschluss
- RS485-Port für MODBUS RTU-Verbindung
- Integriertes Wi-Fi/BLE-Modul
Unico sul mercato
Finder OPTA è un prodotto unico sul mercato per la sua connettività ultra sicura a livello hardware, per la possibilità di eseguire aggiornamenti firmware OTA (Over-the-Air), per la versatilità di programmazione (tramite software open source o linguaggi PLC standard) e per le sue opzioni di connettività.
 Erweiterungsmodule
Die OPTA-Erweiterungsmodule vervielfachen die Anwendungsmöglichkeiten des programmierbaren Logikrelais für eine noch nie dagewesene Anwendungsvielfalt. Die Erweiterungsmodule wurden mit dem Ziel entwickelt, Eingänge und/oder Ausgänge zu verschiedenen Automatisierungsprojekten hinzuzufügen – mit einer maximalen Anzahl von fünf Modulen, die für alle OPTA-Versionen (Lite, Plus, Advanced) verfügbar sind – indem sie die Anzahl der Eingänge (bis zu 80 Eingänge in der digitalen Version und 30 Eingänge in der analogen Version) und der Ausgänge (bis zu 40 Ausgänge in der digitalen Version und 30 in der analogen Version) erhöhen. An jedem Gerät befindet sich ein Auxiliary Port (AUX) zum Anschluss der Erweiterungsmodule an den OPTA.
Erweiterungsmöglichkeiten für mehr Anwendungsmöglichkeiten
Die OPTA Serie umfasst zwei Erweiterungsmodule in digitaler Ausführung und ein Erweiterungsmodul in analoger Ausführung.
-
Relaisausgänge
Typ 8A.58.9.024.1600
- 16 digital/analog (0…10V) Eingänge
- 8 Relaisausgänge, 6 A
- Nennspannung 12…24 V DC
-

SSR
Typ 8A.88.9.024.1600
- 16 digital/analog (0…10V) Eingänge
- 8 SSR-Ausgänge, 3 A
- Nennspannung 12…24 V DC
-

ANALOGICO
Typ 8A.26.9.024.0600
- 6 analoge 0…10 V, 4…20 mA, PT 100 Eingänge
- 2 analoge 0…10 V, 4…20 mA Ausgänge
- 4 PWM Ausgänge
ANLEITUNGEN UND TUTORIALS
Hier finden Sie alle Anleitungen, Tutorials und technischen Unterlagen,
die Sie benötigen, um Finder OPTA einfach und intuitiv zu programmieren.
Benutzerhandbuch
OPTA-Benutzerhandbuch
DetailsIDE
PLC IDE
Erste Schritte mit Finder OPTA und PLC IDE
DetailsEinführung in die Programmierung in PLC IDE mit Finder OPTA
DetailsPLC IDE herunterladen und konfigurieren
DetailsOPTA PLC IDE – Erstinstallation
Schau malVerwendung der PLC-IDE mit der Arduino IoT Cloud
DetailsErweiterungen mit der PLC IDE
DetailsPorte e Connessioni
Erste Schritte mit RS-485 auf Opta™
DetailsErste Schritte mit Modbus RTU
DetailsBluetooth® Low Energy, Wi-Fi® und Ethernet auf OPTA
DetailsSenden von HTTP-Anfragen mit OPTA
DetailsModbus TCP auf OPTA unter Verwendung von PLC IDE
DetailsAnwendungen
Tankfüllstandsüberwachung mit dem OPTA
DetailsOPTA-Anwendungen
DownloadErste Schritte mit OPTA™ und Finder 6M
DetailsErste Schritte mit OPTA™ und Finder 7M
DetailsMultithreading mit OPTA™ und Finder 7M
DetailsKonfigurieren Sie einen Watchdog-Timer auf OPTA
DetailsWebserver auf OPTA
DetailsBLE-Peripheriegerät auf OPTA
DetailsPublish 7M-Serie misst über BLE mit OPTA
DetailsTank-Thermoregulierung
DetailsEnergiemanagement mit OPTA™
DetailsBereichsinformationen
Informationen zum gesamten Sortiment
Schau malFinder Opta-Links und Anwendungsfall
Schau malGetting started with OPTA
DetailsDatenblatt
DownloadOPTA Bedienungsanleitung
DownloadBedienungsanleitung für OPTA-Erweiterungsmodule
Download
software
OPTA ist ein leistungsstarkes, sicheres und einfach zu programmierendes Produkt.
Durch die Partnerschaft mit Arduino Pro können Sie die Open-Source-Plattform Arduino Pro und die einfache Programmierung von Arduino-Skizzen, -Bibliotheken sowie eine optionale Reihe traditioneller Sprachen wie Kontaktplan und FBD, die dem IEC 61131-3-Standard für die SPS-Programmierung entsprechen, integrieren.
Wählen Sie, ob Sie die aktuellste Version der Open-Source-Software Arduino IDE herunterladen, den Online-Web-Editor verwenden oder die Entwicklungsumgebung für die Programmierung mit IEC61131-3-Sprachen (KOP, FUP, ST, AWL und SFC) herunterladen möchten.
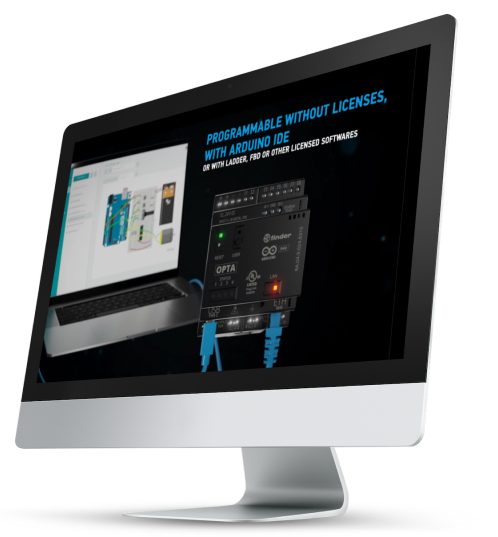
OPTA mit Arduino
OPTA ist ein leistungsstarkes, sicheres und einfach zu programmierendes Produkt. Die Partnerschaft mit Arduino Pro ermöglicht die Integration der Open-Source-Plattform der Marke und die einfache Programmierung von Arduino-Sketches, ohne dabei auf die traditionellen SPS-Programmiersprachen gemäß IEC 61131-3 wie LADDER, FBD usw. zu verzichten.
Community
Segui e partecipa alle discussioni in corso su Finder OPTA e le sue applicazioni.
WEITERE INFORMATIONEN ANFORDERN
Füllen Sie das folgende Formular aus, um weitere Informationen anzufordern. Das Finder-Team kann Ihnen bei der Realisierung Ihres Projekts helfen. Name und Nachname * Name und Nachname *